Fantastic Fermentation, if I can do it SO can you!
 Root crops are ready to pick out in the garden, and winter squash was harvested a bit ago, I would like to keep this food a little longer than the crisper drawer will let me, so with the help of my "Lacto Buddies" (lactobacillus bacteria), salt and spring water. (I also add a splash of whey strained from yogurt). I am going to make scrumptious, crisp, spicy, fermented veggies that we can eat for a while!
 The Cultures for health folks have a ceramic weight you can buy extra to insert into the jar to hold down the food under the brine. The Weight is a must! You will love it!

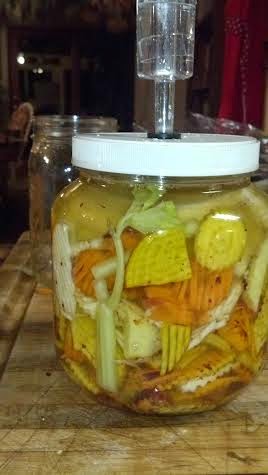
 Fill the jar with the food within 2 inches (5 cm) of the jar lip, insert the weight one side at a time matching the designed edges together like a puzzle. Make sure the brine is topped off at about 3/4 inch from the jar lip (1.25 c)
The Perfect pickler has a small metal cup to put on top of the weight (it is an overflow cup) that collects the fermenting fluids that build up and would normally just drip out onto the counter top, after you seal a lid on.
(If you don't have the pickler kit, you will have to lid your jar, set in in a tray to collect possible drips and open the lid every day to release the Co 2 that will build up from the fermentation process then quickly re-seal). The pickler kit has an air lock that does the "breathing for you" it releases Co 2 build up, but does not let air back in. If you use an airlock system (like Mr. Pickler or you have made your own) do not open the jar again because you risk allowing pathogenic organisms in. Just be patient, and appreciate gazing on it for a few days! Should your veggies ferment so vigorously they push fluid up into the airlock, remove rinse and clean airlock then replace the water in it with clean water and re- insert it in your lid.
So here we are, just like that! Remember to write down the date, on the jar so you know when to check it. Depending on the how warm or cold your home is, it can be 4-10 days. I usually check it about day five. When I think it is done to my taste, I remove the airlock and replace it with a regular sealing lid and place the jar in the refer. That will slow down the fermentation process. After a month or so, it will get a little too mushy for me and I will compost it and start again!

What is possibly fermenting in your kitchen? (That you are fermenting on purpose) Do you have a favorite recipe or a tip or two to share?
Boni Woodland
Root crops are ready to pick out in the garden, and winter squash was harvested a bit ago, I would like to keep this food a little longer than the crisper drawer will let me, so with the help of my "Lacto Buddies" (lactobacillus bacteria), salt and spring water. (I also add a splash of whey strained from yogurt). I am going to make scrumptious, crisp, spicy, fermented veggies that we can eat for a while!
So let’s jump right in and make a jar of root crops and
butternut squash. First I selected and washed roots I wanted to use, left to
right burdock root, parsnips, colored carrots, yellow beets and butternut
squash. (I chose to use the burdock in a
different dish so left it out after all) Also I choose some celery because I did not have the mild peppers that I wanted at this moment.

 Salt
Salt
.jpg "A Good Spring Water") Water sources
Water sources
 The perfect temperature:

Let’s chat about jars real quick-
.jpg)
Back to our work here:
I tossed all the food with the spice, packed the jar I had chosen to make sure I had enough, inserted three pieces of celery in a decorative fashion and also added two thumb size pieces of ginger root, because I love it and it is so good for you!
(Ginger root seems to help the ecosystem along in the inoculation process)
I like to add two tablespoons of whey from my strained yogurt into the brine mix to speed the "Lacto buddies" take over in the ecosystem within the jar. Apparently according to Sandor Katz known as the the "God father of fermentation" it is not really necessary to spike the jars with lactobacillus bacteria from whey, (which is teaming with them); as the veggies have enough on them already naturally -to kick off the fermentation process. (Great if you have allergies to milk) Adding whey will speed up the process a bit, and for me I like it. Check out this easy way to make whey here!
It is important to think of every ingredient you use as an
additive to an ecosystem you are about to create, so you want that ecosystem
in your jar to be made with the best quality foods and other ingredients (no
wilted veggies). Honor yourself with the best you can give yourself, so that
means if you can afford it go organic.
The ecosystem you are putting together is to create a favorable home for the "Lacto buddies" our heroes in this particular type of fermentation. We want them to multiple quickly and take over the neighborhood in the food jar, crowding out all other bacteria and possible invaders.
I know it sounds weird to be wanting to help bacteria thrive in this "Kill all the Germ" era, (At least 99.9% of them!) but yes, in the bigger picture there are organisms that have help us survive as a human race, allowing us to preserve foods in days where the were no refrigerators- and still today there are cultures who rely on fermentation to survive. Science is saying we have about 10 bacteria to one human cell in our composition, so in away we are a complicated composition of organisms that, when we add them into our lives, honor them with the proper ecosystem (Like we will do making this jar of fermented root crops) within our own bodies our health soars, as they and our bowels are 70% or more of our immune system residing in the open spaces of our mouth nose, ears all the way to the exit at your bottom end.
Here is just one of the hundreds of articles out there speaking about what "Bacteria Buddies" can do for you! This article can change your life- for real!
Sauerkraut Test Divulges Shocking Probiotic Count!
So my point in this blog is to make stuff, don't let me get started in talking about the science behind it -(my mother would say "Dontcha know, I could have pert ta near'd had a batch made by now!) So with this one last thought below- lets go make!
"Remember not one person in the US has died from fermented foods".
Here is the list of food advice, salt, water and temperatures
- Vegetables use about 1 lb per quart (just eat the left over’s if you bought too much)
- Fresh veggies please, in season is better
- Local so the food has not travel very far
- Use smaller amounts of dried produce, like mushrooms, tomatoes, fruit for flavoring and color up to ¼ cup
- Cabbage should be heavy moist and dense
- Firm root veggies somewhat thinly sliced
- Don’t use veggies with a wax coating on them
- Fresh mushrooms tomatoes and summer squash don’t work very well
- Veggies with gelatinous seed pockets or that have thin soft skins don’t work very well
- Red peppers -already too ripe
Salt
Good choices:
- Unrefined sea salt like Celtic Salt contains over 70 minerals
- Unrefined sea salt with no additives listed on the packaging.
Poor Choices:
- “Picking salt” found in canning sections of stores
- Table salt has iodine in it or other additives that can discolor the brine and effects the culture
- Kosher salt of any style; it is a table salt with additives
(So when you measure the salt use
a slightly rounded spoonful if it is coarse and a more scant spoonful if it is
fine.)
Water sources
Good choices:
·
Bottled spring water
·
Bottled filter water
·
Tap water using a triple filter with reverse
osmosis filter
Poor Choices:
- Tap water unfiltered-chlorine will effect the fermentation environment
- Tap water with faucet mounted single stage filter ( not good enough)
- Soft water- minerals effect the culture
- Well water- hardness may effects the culture
The perfect temperature:- A conditioned room about 70 F (21 C)
- Room temperature below 74 F (23 C)
- A cool cellar about 64 F (18 C)
- Away from direct sunlight
- Away from heat producing sources
Poor choice:
Warm room above 74 F (23 C)
Wash all your equipment in hot soapy water with a soap that does not contain additives dyes or coating agents. Dishwater soaps also leave behind films with chemicals not good for the cultures you want to develop.
Just be clean, it is not necessary to sterilize everything.
Shopping List:
The veggies you want to ferment
Kimchi spice
Ginger root
Salt
Spring water
Whey from yogurt (optional)
I also have some spice I want to use- Kimchi pepper for just
a small bit of zing! I use about 1 rounded teaspoon. I took my Celtic Sea Salt- and made a brine using 2 Tablespoons to 4 cups of the spring water to pour into the veggie packed jar later when we get to that step.
Now that all those particulars
are out of the way lets chop. I had always wanted one of those fancy
kitchen "slicers and dicers" but could never afford it, So I one day I threw my wish
list out to the “Universe” and a few days later, there it was in my favorite
thrift store brand new for- 10 bucks!! With it I "fancy sliced: all the veggies-
You don’t have to have a machine- it just makes it easier to fancy slice them the way I like. Cut them into about 1/4 inch slices any way you can.
 |
| Mixed Colored carrots |
 |
| Yellow Beets |
 |
| Parsnips |
 |
| Butter Nut Squash |
In my moms time she used
crocks that she probably inherited from her mom, being the South Dakota Farmer
types they were, but since then I have read a caution about using old crocks because of possible lead, or cracks and fissures that can harbor pathogens. So if you have an old one investigate and be careful. When my mom "crocked" -I remember it seeming
to take forever to ferment in those crocks. She would put a plate on the food-
a clean heavy rock to weight it- keeping the food down under the brine, and a white
dish cloth over the whole thing shrouding it. It sprouted scary molds some
times, and she would just scoop it off, and set the plate and rock back anew,
making me doubt the safety of us ever eating what ever she was fermenting. She admitted not ever knowing exactly why the foods fermented, she knew nothing about the lactobacillus bacteria, the
lack of oxygen or the salt being the perfect environment to the food to ferment; she was
just doing what she had learned for years. She just did what she did, and we ate it and lived to tell the stories.
.jpg) |
| Crock with rock |
Now days we have choices! You can use a good glass canning jar- they come in many types and with many lid options. My new exciting item that gives you fermented food in 4-10 days is this Perfect Pickler set up from the Cultures for health folks Perfect Pickler
Click on that link to check it out, it is amazing and only $19.99! I use this for my ferments because they are so light and handy and ( for me to get a crock would mean getting yet - another job just to be able to afford one -as they are expensive!) Check out Cultures for Health here, I highly recommend them for learning and supplies. Our own Peaceful Valley here in town has fermenting equipment also Peaceful Valley .
 |
| Added Spice |
Back to our work here:
I tossed all the food with the spice, packed the jar I had chosen to make sure I had enough, inserted three pieces of celery in a decorative fashion and also added two thumb size pieces of ginger root, because I love it and it is so good for you!
(Ginger root seems to help the ecosystem along in the inoculation process)
 |
| Packed the jar |
 |
| Frozen Ginger root |
.jpg) |
| Sandor Katz |
I was lucky -yet again - to find my awesome yogurt strainer in a thrift store, but you can get a strainer of some kind from Amazon, or a kitchen store, even a tight weave nut bag would work, I've used a coffee filter too. The object is to put plain (nothing added yogurt-as far as sweeteners and flavors go, but it should have LIVE cultures in it-read the label) into a strainer to let the natural whey in it to drip free-say into a jar - see how it is a cloudy looking fluid with a bit of white milk molecules at the bottom? Keep the left overs, to use again as it will keep in the refer for a while.
If you are going to really get into fermentation Sandor's book is a must! (Once more)
 |
| Whey strained out from yogurt |
If you are going to really get into fermentation Sandor's book is a must!
Now we fit it all together, add the brine to fill the jar and use a knife or tool to move the food to release any trapped air, and push the food strongly into the jar packing it tightly.
The Cultures for health folks have a ceramic weight you can buy extra to insert into the jar to hold down the food under the brine. The Weight is a must! You will love it!  |
| The weight |
Fill the jar with the food within 2 inches (5 cm) of the jar lip, insert the weight one side at a time matching the designed edges together like a puzzle. Make sure the brine is topped off at about 3/4 inch from the jar lip (1.25 c) The Perfect pickler has a small metal cup to put on top of the weight (it is an overflow cup) that collects the fermenting fluids that build up and would normally just drip out onto the counter top, after you seal a lid on.
(If you don't have the pickler kit, you will have to lid your jar, set in in a tray to collect possible drips and open the lid every day to release the Co 2 that will build up from the fermentation process then quickly re-seal). The pickler kit has an air lock that does the "breathing for you" it releases Co 2 build up, but does not let air back in. If you use an airlock system (like Mr. Pickler or you have made your own) do not open the jar again because you risk allowing pathogenic organisms in. Just be patient, and appreciate gazing on it for a few days! Should your veggies ferment so vigorously they push fluid up into the airlock, remove rinse and clean airlock then replace the water in it with clean water and re- insert it in your lid.
So here we are, just like that! Remember to write down the date, on the jar so you know when to check it. Depending on the how warm or cold your home is, it can be 4-10 days. I usually check it about day five. When I think it is done to my taste, I remove the airlock and replace it with a regular sealing lid and place the jar in the refer. That will slow down the fermentation process. After a month or so, it will get a little too mushy for me and I will compost it and start again!
What is possibly fermenting in your kitchen? (That you are fermenting on purpose) Do you have a favorite recipe or a tip or two to share?
Boni Woodland